Thursday, April 12, 2012

Hotlead convention game

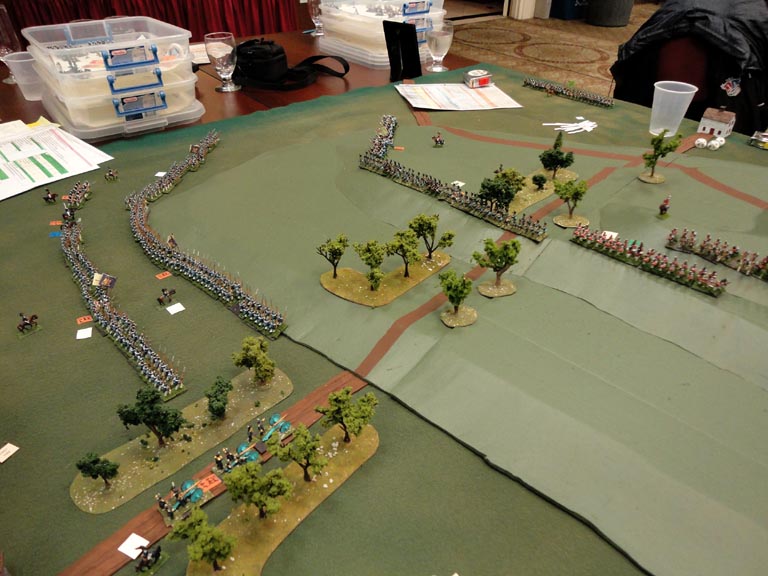
Bob and I decided that our contribution to Stratford Ontario's Hotlead gaming convention would be to put on a large scale Lundy's Lane game. This would follow the War of 1812 theme of the convention. To add to the 'WOW!' factor we'd use a ratio of 1 figure = 5 men. Bob supplied the figures and since Bob is a human painting machine he had enough figures to even do the battle on a 1 to 1 ratio! Can we? We figured we'd need a 25' wide table and I wasn't prepared to make all that terrain so we kept it at 1 to 5. The figure size was 15mm.
Our test game. The hill was on it's last legs.
For our test game back at my house we used our original hill terrain from a game we did about 10 years back. The Styrofoam flocked hill was in poor shape. The flocking was coming off and the edges of the hill were chipping away. To transport this one large piece to a convention would be a nightmare. We had to make a new hill.
A 6' x 10' table for our setup. Our new terrain at the convention.


I made the new hill out of Styrofoam again but in 3 easier to transport pieces. I also decided not to flock it. I hate flocking! This time the hill is taller to really show the Lundy's Lane heights.We also decided we didn't need tons of trees as per our test game. We used some historical maps as a terrain reference and we noticed the fighting zones of the battle were not wooded except the eastern edge. To further increase the portability of my terrain I decided to use for the first time my new woods terrain. You can see in the photo above they are pine trees with magnets glued on their based in a recessed hole. The base stands are painted pieces of sheet metal. I'll do a report later on the details of this tree project.
The game starts. Scott's bridge approaches the hill.
We had 3 players for each side. The opening moves are on the US side with Scott's bridge approaching the hill. The British force on the hill, Pearson's light brigade and Morrison's force send out a cavalry squadron to see if Scott's artillery hugging the trees is worth an charge. They stayed too far out and 2 of Scott's regiments got close enough to fire some deadly volleys into them. The cavalry suffered heavy losses and routed. They never make an appearance again.
Scott's brigade presses forward.
Because of the deadly British battery on the hill top the US forces never go near the center. Scott's brigade concentrates on rolling up the British left flank.
As the game progresses the British decide to occupy the front center of the hill.
The British players decide that to alleviate pressure on their left they'll move a few regiments down the hill in the unoccupied center.
As a routed Canadian militia regiment (IMUC) leaves the field, Scott's brigade reforms.
The Incorporated Militia of Upper Canada breaks and runs. Now Scott's brigade has to contend with Hercules Scott's brigade coming up the other other side of the hill.
The last US brigade arrives on the field.
Porter's brigade finally arrives on the field. The US side decides to deploy them on the British right. Hopefully this will take pressure off Scott's brigade on the opposite side of the field. Against them are part of Morrison's force (Glengarry Light Infantry) and some embodied militia units.
Porter's brigade advances.
Now one would think that Porter's fresh brigade would easily push back the militia in front of them. Porter's first regiment actually has a poor moral check and ends up routing throwing the whole line into disarray. At this point after gaming for 4 hours and 13 turns of a nail bitter game we called it over. We agreed it was a British / Canadian victory with heavy casualties on both sides. Actually quite like the historical outcome.
The rules we used where home grown and worked very well except one melee that had a cavalry charge on a routed unit being a failure resulting in the cavalry unit routing! I'll have to work on that.


Sunday, March 18, 2012

Coldwars 2012

Bob and I decided to go to the Coldwars gaming convention in Lancaster Pennsylvania. We haven't been there in 3 years so we were long overdue. Coldwars is one of the larger conventions that occupies the whole Lancaster hotel. All the ballrooms were used. After a 9 hour drive we were greeted with a $40 fee for the convention. Wow! Prices have gone up. This will definitely be an every other year event for me.
Well we got what we wanted from this event. The dealer hall!!!
Shopping anyone?

After doing some serious damage to our wallets it was time to game. This year's theme at Coldwars was the War of 1812. There was quite a few 1812 games presented. Some of the presentations were beautiful. One of the first I observed was the Battle of Chippewa done in 25mm.
Looking at ground level the Chippewa battlefield.
Most if not all the terrain was bought by the game host. Still the visual impact was evident.
A US regiment attempts to clear British skirmishers on the US left flank.

British Artillery
The 2 apposing lines get engaged.
I thought at first the British had the upper hand in this one but the US forces prevailed.

I saw the largest age of sail game in my life. It was the Battle of Beachy Head, June 30th 1690. This was a naval battle between an Anglo Dutch force and the French.
Naval battle of Beachy Head 1690.
This game was huge. I believe they were looking for 30 people to play it. The most I saw play was about 10. Perhaps it's size was intimidating?
A closeup view. An endless line of ships.

There was some excellent games going on. The neatest trend I saw was the use of mini flashing LED lights in cotton puffs. It really looked like gun fire through the smoke. I managed to capture the look in the photo below.
English civil war, 25mm.
The fighting gets hot as the opposing lines get closer (ECW)
One of the strangest presentations was the use of a sand table. These guys actually slugged bags of sand and put together some framing to contain it.
The sand is formed and ready for terrain colouring and trees.

The finished product.
 I can understand the versatility of the sand table but for gaming it's not practical for portability or even gaming. The sand is very soft so you can't lean on it. I even found it was difficult to even see the gaming figures on it!
A large ACW game done in 25mm.
I loved the beautiful terrain for this ACW game. The cornfield in the center became the main combat area.
The Rebs make a stand at the edge of the cornfield as the Union attack in column.
Gettysburg, Devil's Den, 15mm.
The one game I did participate in was the Battle of Queenston Heights, War of 1812. This was a fun game and a nail biter I might add. I played on the Brit/Canuck side and had to repel the US landing on the Canadian shore.
Boats full of US troops make their way to shore.
The US Forces managed to land on shore and capture the battery that was halfway up the heights. That became the area of fighting. The US tried to capture the town of Queenston but couldn't hold on to it. The game ended up with a Brit/Canadian victory.
Overall I highly recommend going to these larger conventions. Just the dealer hall alone is worth it.


Sunday, February 5, 2012

Overwhelming force attack.

We've all read stories on how a few German tanks if located in the right spot could hold off numerous Allied forces. To see if this was possible in a wargaming event we decided to throw as much armour as we could at a small yet powerful German force. The Allies attacked with about 36 tanks. A combination of Sherman M4A1's, Firefly's, and Churchill Mk VII's. The Germans had 2 Stug III's, a Tiger I, 2 Panthers, A Jagpanzer IV, and 2 Mk IV's. A 4 to 1 attack ratio. The terrain this time would have no rivers or creeks with choke points at crossings. It would be a simple western Europe landscape with a few hills, lots of woods and roads.
View from the German side.
The German's kept their heavies back on the right but moved their Panthers and Jagpanzer IV up to a stone wall which acted like being in a defilade position. The Allied forces on the other hand had to move through some choke points in the terrain. The Germans had them zero'd in.
Initial deployment on the German left.
 The 2 Panthers on the left soon moved away from the stone wall. One went further left to protect that area from flank attacks while the other maneuvered to the crossroads to the right or center of the table on the other side of the shelled out house.
Allied forces advance under deadly fire.
As the Allied forces advance a few Shermans are picked off. It was decided to rush up as much armour as possible with the objective of overwhelming the German defense.
A Panther and Pak 40 await the Allied rush.
On the Allied right it was decided that the Shermans would hit over the around the left side of the hill while a group of 6 Churchill Mk VII's would attack to the right of the hill.
The Panther attacks.
The Pak 40 at the tree line was overwhelmed with gunfire but the Churchill's were outclassed by the more lethal Panther and it's high velocity 75mm gun. Soon all 6 Churchill's were knocked out. Even a Sherman comes over to lend some help to the struggling Churchill's and ends up getting knocked out by a Panzershreck.
Panther gets nailed.
 Some limited Allied success happened in the middle of the table with the Panther stationed there getting knocked out from a very tight flank shot.
Allied problems on their left
Maneuvering room was a premium for the Allies. The limited space they had was getting choked up with knocked out Shermans. The Allies lost 12 tanks while the Germans had lost only 1 (Panther) with 2 others (Stug III's) having their main guns knocked out. One managed to back out of the battle while the other became immobile and would eventually be abandoned.We discovered that with limited maneuvering room the Allies vast numbers couldn't be brought to bare in an effective way. We were thinking of running this game with the direction of advance being from the width of the table rather than the length. This would widen the table and allow for more maneuvering room for the Allies.

The scale of the game was 1 to 1 both for vehicles and figures. The rules are homegrown. The game lasted about 4 1/2 hours.

Sunday, January 29, 2012

Rush to capture the town.


We decided to try a scenario of Allied armour trying to cross a few bridges and capture a small Normandy town. The Allies had as usual vast amounts of armour while the German forces had 3 MkIVH's, 2 Stug III's, and a Panther. Also in the German OOB was a Pak 40 and Pak 38 anti-tank gun and 3 squads of infantry.
One of the bridge crossings across from the town. The other crossing is far to the left.
The Germans didn't want to expose their armour trying to hold the bridges so they decided to set up defensive positions further back.
The other crossing. No resistance yet.
The Allied OOB has a Canadian force attacking with about 10 Shermans from the left while and American force of roughly the same size attacks from the crossing directly in front of the town.
The view from the German side showing the Canucks crossing. The Germans are about to start defensive firing.
The Canadian armour was surprised the crossing was unapposed but a short distance down the road the German forces opened up. The Stug III on the hilltop was in excellent position to slow them down. The Panther was there too to add support while the remaining Stug III waited off to the left in reserve.
The fighting starts.
The most effective units on the German side where the Stug III on the hill and the Pak 38. 2 Shermans were knocked out and one immobilized. A German squad in the shelled out building added to the carnage with a Panzerfaust. The Canadian response was immediate. The Panther was surprisingly ineffective. The Canadians moved up infantry to take out the Pak 38. The Panther had it's main gun knocked out so it quickly backed out of the area with a panicked crew. The Stug III on the the other hand had to deal with the remaining 7 Shermans and was soon knocked out.
Canadian armour moves past.
The reserve Stug III can't maneuver in time and is quickly taken out.
The German right was torn open. The infantry squad that was in the ruined house fell back. They had nothing to stop the armoured onslaught.
At the American crossing again the Germans allowed them to cross.
A traffic jam at the bridge crossing.
At this crossing the Germans had a Pak 40, and the 3 Mk IVH's. The American infantry stayed off the bridge and crossed the river at a ford to the left.

Waiting for the Allied rush.
As the American Shermans rushed across the bridge the Germans fired everything they had.
4 Shermans are knocked out and the German infantry in a nearby building pins the American infantry at the treeline.
The Pak 40 fires as fast as it can but it's support of 2 MkIVH's don't last long.
The American forces at this time realize that the only resistance left is infantry and the Pak 40.
The Pak 40 is overrun. The town is soon under Allied control.
The Mk IVH in the distance was soon knocked out.
The game ended with about a 3rd of the Allied armour knocked out. The Germans fared worse. All their armour was destroyed with the exception of the Panther. It managed to exit the board. Both Pak guns were destroyed too. One of the three German squads was lost.
The game lasted about 4 hours with 4 of us playing. We used my home grown rules. The scale of the gaming material is 1/72 and the rules use a 1 figure = 1 man set up.
The end of the game.

Saturday, October 8, 2011

Another try at ASL for minitures

My friends Greg and Rich from London dropped by to give my friend Bob and I another try of their ASL rules modified to miniatures. I supplied the table and terrain and they'd supply the figures and vehicles.
The scenario was a run for control of a bridge '44 Eastern Front. Rich and I were the Germans while Bob and Greg were the red hordes. The game starts off with recon units from both sides approaching the river.
View from the German side, bridge in the distance.
 Rich has one Sd Kfz 251/1 halftrack and a Puma Sd Kfz 234/2 while I have 2 Sd Kfz 251/1 halftracks and a Panzerspahwagen
Sd Kfz 250/9. Rich decides to go left around the hill while I attempt a crossing of the river between the gap between the trees on the right.

The infantry stands behind are actually riding in the half tracks..

An infantry squad lost too!
The Russians manage to get some assault guns on a hill on their side of the river and manage to nail one of my half tracks.
At the river.
I decide to have my anti-tank section cross first.
A lend lease M2 waiting to nail anyone crossing the river.
Now how do I get rid of that enemy half track?
The Puma in over watch position.
On the left side Rich moves his infantry squads through the woods to attempt to cross the river higher up. The Puma watches for anything coming across the bridge.
Nailed!
The panzershreck team manages to take out the retreating M2 halftrack but the supporting squad can't go any further than the wreck because of a couple of T34's and some Russian infantry squads to their right. My plan of controlling the bridge from the far side is not going to be easy! I had hoped that my Sd Kfz 251/1 could make a quick dash across the road and into cover but I didn't expect the 2 T34's to be so attentive.
Quick kill by my Pz Mk IV H.
Greg attempts a run across the bridge with one of his T34's. My Pz Mk IV H got off the first shot and managed to take it out.
Russian armour at the river.
 German reinforcements consist of 3 Pz Mk IV H's and 3 Stug III's Rich puts a Mk IV and a Stug on the hill while one of my Mk IV's gets nailed on the road. My other one had it's main gun knocked out and the crew decides to drive off in the other direction.
Too exposed!
With all the Russian armour at the river my Mk IV was too exposed and eventually succumbed to enemy fire.
Crossing on mass.
The Puma was no match to stop the heavy Russian armour. The German squads at the tree line by the river actually had better success in holding back the Russian infantry. It was at this time we called it a game. There were points allocated for vehicle hits and infantry casualties. The German side actually had knocked out more Russian armour (which was historically correct) but that one adventurous T34 that made it across the bridge before getting knocked out gave the Russians the extra points needed to win the game.
And how did the ASL adapted rules work? Fine accept for one issue I brought up. Masses of tanks and infantry could fire through each other at different targets. Sure they got a negative modifier added to their combat results but I found this feature annoying. I mean how can one tank fire over another friendly tank? The line of sight was blocked. Besides this issue the game moved quickly and was challenging.